Serum Presets
-
Future Bass, Dubstep, Techno, House & Pop
2holliz Starter Pack
-
Hyperpop Sample Pack


Why do some producers spend hours struggling with preset installations while others get their new sounds working in minutes? The difference lies in understanding the correct installation process for Xfer Serum presets, where following the right steps ensures your premium preset packs work flawlessly from the first attempt.
1. Copy the folder with the .fxp or .SerumPreset files.
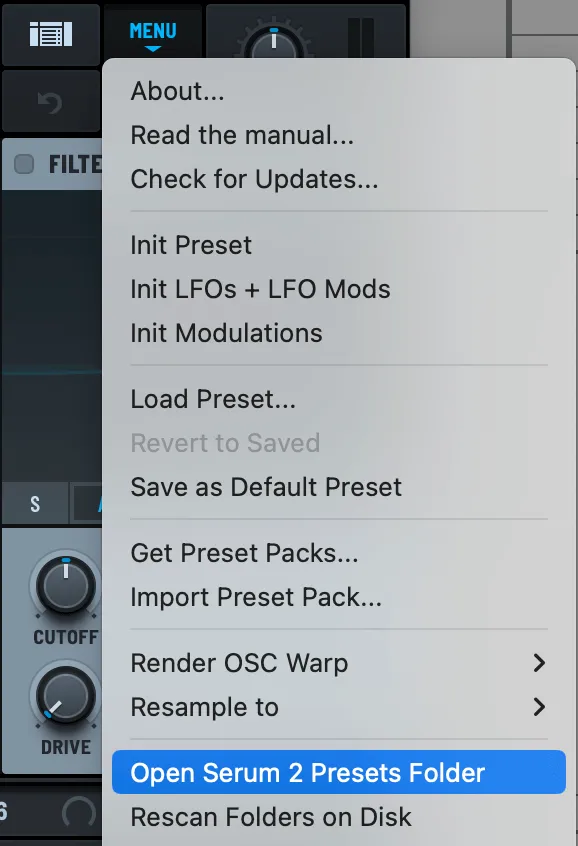
2. In Serum 2 - Menu > Open Serum 2 Presets Folder.
3. Go in the Presets folder.
4. Paste the folder with the .fxp or .SerumPreset files.
5. In Serum 2 - Menu > Rescan Folders on Disk

Traditional preset installation requires manual file placement but offers greater flexibility for organization. Download and extract your preset pack to a temporary location before installation. Windows users should right-click and select "Extract All," while Mac users can double-click the archive for automatic extraction to the same directory.
Copy extracted preset files to your Serum User folder, maintaining any subfolder structure the preset designer created. After copying files, return to Serum and select Menu > Rescan Folders on Disk to refresh the preset browser. This rescan process ensures new presets appear in the browser immediately without restarting your DAW.
1. Drag and drop the .SerumPack file directly onto Serum's interface.
The installation process varies depending on your Serum version and preset format, with modern methods offering significantly improved user experience. For Serum 2 SerumPack files, simply drag and drop the file directly onto Serum's interface while the plugin is open. This instant installation method automatically places all included content in the correct directories without manual file management.
1. Access Menu > Import Preset Pack.

2. Browse & select your .SerumPack file.
Alternative SerumPack installation uses Serum 2's Import Preset Pack function. Access Menu > Import Preset Pack and browse to your SerumPack file through the system dialog. This method provides more control over the installation process and confirmation that the pack installed successfully through visual feedback.
Modern Serum installations work with multiple file formats, each requiring specific handling for successful integration. Traditional .fxp files remain the standard format for individual Serum presets and work with both Serum 1 and Serum 2. These single preset files contain all the synthesizer settings needed to recreate specific sounds, making them the most widely distributed format among producers.
Serum 2 introduces .SerumPack files as a revolutionary preset distribution method that streamlines installation. These archive files can contain multiple presets, wavetables, and noises in a single package, dramatically simplifying the installation process. SerumPack files eliminate the need for manual file placement and folder navigation that traditional methods require.
Preset packs often include additional resources beyond the main presets. Custom wavetables (.wav files) extend Serum's sonic capabilities by providing unique oscillator sources that standard factory content cannot produce. These specialized waveforms are essential for achieving the authentic sounds that premium preset designers intended.
Noise files and LFO shapes complete comprehensive preset packages, providing the textural elements and modulation curves that separate professional presets from basic factory sounds. Understanding these file types ensures you install complete preset experiences rather than missing crucial sonic components that diminish the intended sound quality.
Finding the correct installation directory is crucial for successful preset integration, with Serum providing built-in tools to eliminate guesswork. Open Serum in your DAW and click the Menu button in the top-right corner, then select "Open Serum 2 Presets Folder" to automatically open your system's preset directory. This method works on both Windows and Mac, ensuring accurate folder location regardless of your operating system.
Windows users will find their presets in the default location: C:\Users\[Your Username]\Documents\Xfer\Serum Presets\Presets\User. This path structure remains consistent across Windows versions, though custom installations might alter the base directory. Always verify the location through Serum's menu system rather than assuming standard paths.
Mac users should navigate to /Library/Audio/Presets/Xfer Records/Serum Presets/Presets/User for preset installation. Hidden library folders might require enabling visibility through Finder's View menu or using Command+Shift+G to manually enter the path. The Library folder location ensures presets remain accessible across user accounts.
Subfolder organization within the User directory allows efficient preset management without affecting Serum's functionality. Create custom folders for different preset packs, genres, or producers to maintain an organized library. Serum reads one level of subfolders, so organize accordingly without creating nested directory structures that become invisible to the browser.
Comprehensive preset packs often include custom wavetables that extend Serum's sonic possibilities beyond factory content. Navigate to the Tables folder within your Serum Presets directory using the same Menu > Open Serum 2 Presets Folder method, then open the Tables subfolder. This location houses all wavetable files that Serum's oscillators can access.
Custom wavetables typically arrive as .wav files that contain multiple waveform cycles within a single audio file. Drag wavetable files into the Tables/User folder to make them available in Serum's wavetable browser. Proper wavetable installation ensures presets load with their intended oscillator sources rather than defaulting to factory alternatives.
Noise files provide textural elements that many modern presets rely on for their characteristic sound. Install noise files in the Noises/User folder following the same extraction and copying process used for presets. These audio files appear in Serum's noise oscillator section, providing the ambient textures and filtered noise sources that complete professional preset designs.
Remember to rescan folders after installing any additional content to ensure Serum recognizes new wavetables and noise files. The rescan process updates all content browsers simultaneously, making newly installed materials immediately available for use in your productions without requiring plugin reinitialization.
Installation problems typically stem from incorrect file placement or system-level restrictions that prevent proper file access. If presets don't appear after installation, verify file locations by checking that .fxp files are in the correct Presets/User directory. Mixed file types or presets from other synthesizers can cause browser display issues.
Missing wavetables or noise files cause presets to load incorrectly, often producing silence or unexpected sounds. Check that all included content from preset packs has been installed in the appropriate folders. Some preset designers include custom content that's essential for authentic sound reproduction.
File permission issues on Mac systems can prevent preset installation in system directories. Try installing presets in user-specific directories rather than system-wide locations, or adjust folder permissions through the Get Info dialog. Administrative privileges might be required for installation in certain system directories.
Effective preset organization becomes increasingly important as your library grows, requiring strategic folder structures that support creative workflow. Create genre-specific folders within the User directory to categorize presets by musical style, such as "House," "Techno," or "Future Bass." This organization method helps locate appropriate sounds quickly during production sessions.
Producer-based organization offers another effective approach for managing extensive preset collections. Create folders named after preset designers or companies to maintain brand association and stylistic consistency. This method proves particularly valuable when using presets from the same creators across multiple projects.
Implement a favorites system by creating a dedicated "Favorites" folder for frequently used presets. Copy your most-used presets to this location for instant access, or use Serum's built-in star rating system to mark preferred sounds. Quick access to proven presets accelerates creative decision-making during production.
Regular library maintenance prevents organizational decay that slows creative workflow. Periodically review your preset collection, removing duplicates and organizing new acquisitions. Clean, well-structured preset libraries enhance productivity by reducing time spent searching for specific sounds during inspired creative moments.
Successfully installed presets represent just the beginning of your creative journey with professional sound design. Study preset construction by analyzing oscillator settings, filter configurations, and modulation routing to understand how professional sounds are crafted. This analysis builds sound design skills while maximizing preset educational value.
Preset modification develops your unique sonic signature while building upon professional foundations. Experiment with filter cutoffs, envelope settings, and effect parameters to create variations that suit your specific musical needs. Save modified presets with descriptive names to build a personalized sound library.
Layer multiple presets to create complex textures that exceed individual preset capabilities. Combine lead and pad presets, or blend bass presets with subtle harmonic content for unique low-end character. Layering techniques expand your sonic palette exponentially using existing preset investments.
Why do some producers spend hours struggling with preset installations while others get their new sounds working in minutes? The difference lies in understanding the correct installation process for Xfer Serum presets, where following the right steps ensures your premium preset packs work flawlessly from the first attempt.
1. Copy the folder with the .fxp or .SerumPreset files.
2. In Serum 2 - Menu > Open Serum 2 Presets Folder.
3. Go in the Presets folder.
4. Paste the folder with the .fxp or .SerumPreset files.
5. In Serum 2 - Menu > Rescan Folders on Disk
Traditional preset installation requires manual file placement but offers greater flexibility for organization. Download and extract your preset pack to a temporary location before installation. Windows users should right-click and select "Extract All," while Mac users can double-click the archive for automatic extraction to the same directory.
Copy extracted preset files to your Serum User folder, maintaining any subfolder structure the preset designer created. After copying files, return to Serum and select Menu > Rescan Folders on Disk to refresh the preset browser. This rescan process ensures new presets appear in the browser immediately without restarting your DAW.
1. Drag and drop the .SerumPack file directly onto Serum's interface.
The installation process varies depending on your Serum version and preset format, with modern methods offering significantly improved user experience. For Serum 2 SerumPack files, simply drag and drop the file directly onto Serum's interface while the plugin is open. This instant installation method automatically places all included content in the correct directories without manual file management.
1. Access Menu > Import Preset Pack.
2. Browse & select your .SerumPack file.
Alternative SerumPack installation uses Serum 2's Import Preset Pack function. Access Menu > Import Preset Pack and browse to your SerumPack file through the system dialog. This method provides more control over the installation process and confirmation that the pack installed successfully through visual feedback.
Modern Serum installations work with multiple file formats, each requiring specific handling for successful integration. Traditional .fxp files remain the standard format for individual Serum presets and work with both Serum 1 and Serum 2. These single preset files contain all the synthesizer settings needed to recreate specific sounds, making them the most widely distributed format among producers.
Serum 2 introduces .SerumPack files as a revolutionary preset distribution method that streamlines installation. These archive files can contain multiple presets, wavetables, and noises in a single package, dramatically simplifying the installation process. SerumPack files eliminate the need for manual file placement and folder navigation that traditional methods require.
Preset packs often include additional resources beyond the main presets. Custom wavetables (.wav files) extend Serum's sonic capabilities by providing unique oscillator sources that standard factory content cannot produce. These specialized waveforms are essential for achieving the authentic sounds that premium preset designers intended.
Noise files and LFO shapes complete comprehensive preset packages, providing the textural elements and modulation curves that separate professional presets from basic factory sounds. Understanding these file types ensures you install complete preset experiences rather than missing crucial sonic components that diminish the intended sound quality.
Finding the correct installation directory is crucial for successful preset integration, with Serum providing built-in tools to eliminate guesswork. Open Serum in your DAW and click the Menu button in the top-right corner, then select "Open Serum 2 Presets Folder" to automatically open your system's preset directory. This method works on both Windows and Mac, ensuring accurate folder location regardless of your operating system.
Windows users will find their presets in the default location: C:\Users\[Your Username]\Documents\Xfer\Serum Presets\Presets\User. This path structure remains consistent across Windows versions, though custom installations might alter the base directory. Always verify the location through Serum's menu system rather than assuming standard paths.
Mac users should navigate to /Library/Audio/Presets/Xfer Records/Serum Presets/Presets/User for preset installation. Hidden library folders might require enabling visibility through Finder's View menu or using Command+Shift+G to manually enter the path. The Library folder location ensures presets remain accessible across user accounts.
Subfolder organization within the User directory allows efficient preset management without affecting Serum's functionality. Create custom folders for different preset packs, genres, or producers to maintain an organized library. Serum reads one level of subfolders, so organize accordingly without creating nested directory structures that become invisible to the browser.
Comprehensive preset packs often include custom wavetables that extend Serum's sonic possibilities beyond factory content. Navigate to the Tables folder within your Serum Presets directory using the same Menu > Open Serum 2 Presets Folder method, then open the Tables subfolder. This location houses all wavetable files that Serum's oscillators can access.
Custom wavetables typically arrive as .wav files that contain multiple waveform cycles within a single audio file. Drag wavetable files into the Tables/User folder to make them available in Serum's wavetable browser. Proper wavetable installation ensures presets load with their intended oscillator sources rather than defaulting to factory alternatives.
Noise files provide textural elements that many modern presets rely on for their characteristic sound. Install noise files in the Noises/User folder following the same extraction and copying process used for presets. These audio files appear in Serum's noise oscillator section, providing the ambient textures and filtered noise sources that complete professional preset designs.
Remember to rescan folders after installing any additional content to ensure Serum recognizes new wavetables and noise files. The rescan process updates all content browsers simultaneously, making newly installed materials immediately available for use in your productions without requiring plugin reinitialization.
Installation problems typically stem from incorrect file placement or system-level restrictions that prevent proper file access. If presets don't appear after installation, verify file locations by checking that .fxp files are in the correct Presets/User directory. Mixed file types or presets from other synthesizers can cause browser display issues.
Missing wavetables or noise files cause presets to load incorrectly, often producing silence or unexpected sounds. Check that all included content from preset packs has been installed in the appropriate folders. Some preset designers include custom content that's essential for authentic sound reproduction.
File permission issues on Mac systems can prevent preset installation in system directories. Try installing presets in user-specific directories rather than system-wide locations, or adjust folder permissions through the Get Info dialog. Administrative privileges might be required for installation in certain system directories.
Effective preset organization becomes increasingly important as your library grows, requiring strategic folder structures that support creative workflow. Create genre-specific folders within the User directory to categorize presets by musical style, such as "House," "Techno," or "Future Bass." This organization method helps locate appropriate sounds quickly during production sessions.
Producer-based organization offers another effective approach for managing extensive preset collections. Create folders named after preset designers or companies to maintain brand association and stylistic consistency. This method proves particularly valuable when using presets from the same creators across multiple projects.
Implement a favorites system by creating a dedicated "Favorites" folder for frequently used presets. Copy your most-used presets to this location for instant access, or use Serum's built-in star rating system to mark preferred sounds. Quick access to proven presets accelerates creative decision-making during production.
Regular library maintenance prevents organizational decay that slows creative workflow. Periodically review your preset collection, removing duplicates and organizing new acquisitions. Clean, well-structured preset libraries enhance productivity by reducing time spent searching for specific sounds during inspired creative moments.
Successfully installed presets represent just the beginning of your creative journey with professional sound design. Study preset construction by analyzing oscillator settings, filter configurations, and modulation routing to understand how professional sounds are crafted. This analysis builds sound design skills while maximizing preset educational value.
Preset modification develops your unique sonic signature while building upon professional foundations. Experiment with filter cutoffs, envelope settings, and effect parameters to create variations that suit your specific musical needs. Save modified presets with descriptive names to build a personalized sound library.
Layer multiple presets to create complex textures that exceed individual preset capabilities. Combine lead and pad presets, or blend bass presets with subtle harmonic content for unique low-end character. Layering techniques expand your sonic palette exponentially using existing preset investments.

Surge Sounds designs cutting edge presets and samples.


